 Ever have one of those moments when a realization just hits you and you want to slap your forehead in one of those “NOW I get it!” moments? I just had one.
Ever have that feeling just moments after that “Aha Moment” where you feel a bit silly for taking so long to “get it?” I just had one of those too.
I guess part of the fun of photography is that there is so much to it that the learning just continues and continues. Sure we can get really frustrated during this lengthy process, but bored? No, not me. And hopefully not you either.
So, what did I learn? Well, I learned about the benefit of using manual exposure to create dramatic effect in images. It has been a long slow process getting to this point but I believe it is finally beginning to sink in, slowly.
Let me walk you through my process so that you follow what a significant, yet simple, realization this is. And also one that shifts a paradigm for me in terms of thinking about making, taking, creating images.
1) When I first started to explore photography seriously a friend suggested I shoot in Manual Mode, so I did. For those of you who aren’t familiar with Manual Mode it is the mode where the photographer makes all the exposure decisions in making the image. The photographer (me!) chooses the shutter speed and aperture. By contrast, the Full Auto mode of Program Auto, and the semi-auto modes of Shutter Speed Priority and Aperture Priority, allow the camera to make its bazzilion calculations to determine the “correct” exposure and then set the settings automatically to match that exposure. The problem with how I started using Manual Mode is that I depended 100% on the light meter reading in camera to determine exposure. Sure, I might increase or decrease the exposure by 1/3 of a stop for one reason or another, but mostly I was wildly spinning the dials to match the cameras idea of a “correct exposure.” It was fun and I felt all pro, but I missed a lot of shots because I was busing messing with the dials. So I began to wonder why I was using the camera this way.
2) So I switched to Aperture Priority. In this mode I chose the aperture and the camera did its bazillion calculations to determine “correct exposure” and then set the shutter speed automatically to achieve this exposure. Great. Now I was controlling some of the aesthetics of the image (namely depth of field-or the area that is in or out of focus). Sometimes I switched to Shutter Speed Priority where I chose the shutter speed and the camera did its bazillion calculations and set an aperture to create “correct exposure” but 95% of the time I shot Aperture Priority. Sure, sometimes I fiddled with Exposure Compensation but, you know, just 1/3 or 2/3 of a stop over or under exposed based on whether my subject was backlit or not.
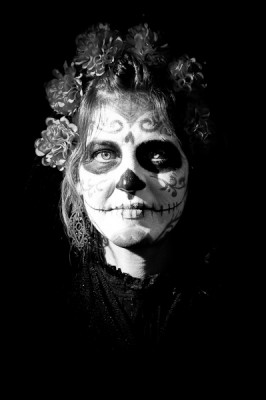
3) Then one day I was shooting the Dia de los Muertos parade here in Albuquerque and the light was waning in the evening. Soon it was dark and so out came my flash. I popped it on the camera (gasp!), left the aperture right where it was (wide. open.) and set the flash  on auto-through-the-lens-trust-me-I’m-Nikon-and-I-won’t-let-you-down, and tried to photograph a lovely person who had volunteered to be photographed. Kablooey!!! I nuked them into next week. My friend Marc, the camera whisperer, took pity on the poor soul in front of me and took the minute or two she was taking to regain her vision to help me out. “What are you set on?” he asked. “Oh, no, no, no. Set your camera to manual, f8, 1/250th. Start there and dial it in. Always set your camera to manual and start there or else the camera will try to make the black of the evening into middle grey and everything will be over-exposed.” “Oh.” I said. So I tried to burn that advice into my memory and it has helped. It’s not the only way to do things with the flash, I know, but it was a good learning for me. And I did finally end up with the image to the right.
4) Then this spring I had the opportunity to take Joe McNally and Dave Hobby‘s Flashbus Tour workshop and I was struck by the direction that Dave Hobby takes with his flash photography. His first bit of advice was 1) set your ambient exposure in manual and 2) layer your (strobe) light on top of that. “Hey, wait!” I thought, “there is that manual thing again.” What struck me most was that he often stops down the ambient light by 1 or 2 stops, leaving a little light in there, and then adds light with his strobes. And here was the key piece, he was not listening to what his camera is saying is a “correct exposure.” He does a quick peek at what the camera thinks is good, stops the exposure down 1-2 stops with his shutter speed, and then begins to add light with his strobes.
5) And slowly, slowly, slowly that awareness that we need to sometimes NOT listen to our camera’s idea of a “correct exposure” has begun to sink in. And I finally “got it” today when I saw this image by Gael Turine. Had the photographer not been shooting in Manual Mode and not chosen to “underexpose” the image (or had he followed a light meter’s direction on what is a “correct exposure”) then lots of what we see as black would have been exposed to make it look middle grey, and the lighter parts of the image would have been overexposed to the point of having no texture, making the image look completely different and less interesting.
And so there is my “Aha!” moment. Simple, but counter-intuitive if you’ve come to trust the light meter in camera to determine exposure. Time perhaps to throw most of that direction aside and play with stopping the exposure down or up. Time to start to play outside the limits of 1 stop over or under exposed and see what fun there is to have. (I actually wrote this article before I shot the images for my previous post on the Balloon Fiesta. All of the black and white nighttime images in that post were “underexposed” by about 2 stops.)
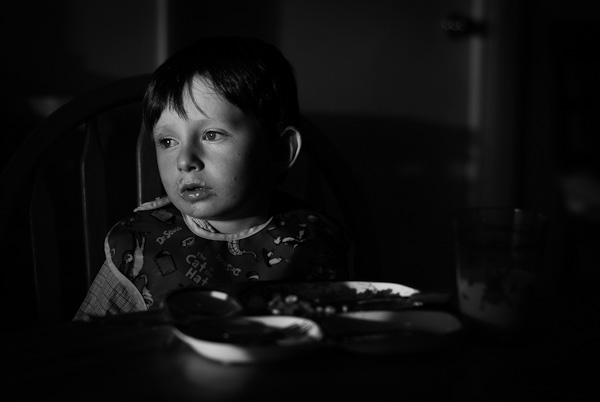
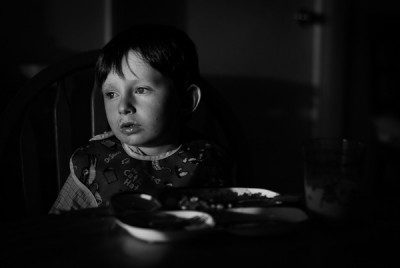
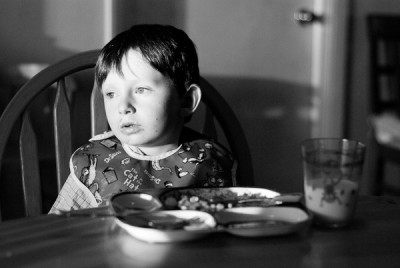
Note: the image at the top of my son daydreaming during his dinner was shot in natural light and I stopped the exposure down 2 full stops from what the TTL light meter told me was a “correct exposure.” Why not compare the two exposures below. The top image is stopped down 2 stops from what the camera’s light meter thinks is the “correct exposure” (bottom image).


